 I hope you enjoy this post. If you want my help to build lean muscle & transform your body using a TRX suspension trainer anywhere –
Mobility exercises often feel like another fitness fad or influencers showing off…
But trust me, I’m not being cliched when I say better mobility will dramatically improve the quality and longevity of your life.
So, in this post, I’m going to show you the five most effective TRX suspension training exercises for noticeable gains in:
- mobility
- Increased flexibility
- Safely building strength
Even if you’re starting from scratch, as many people in our community did…
To start, let me show you the #2 most powerful mobility exercise in the world.
#1 is coming after…
Don’t have time to read the post in full? Then watch the video below to learn the 5 BEST TRX suspension trainer exercises For INCREDIBLE mobility…
Table Of Contents
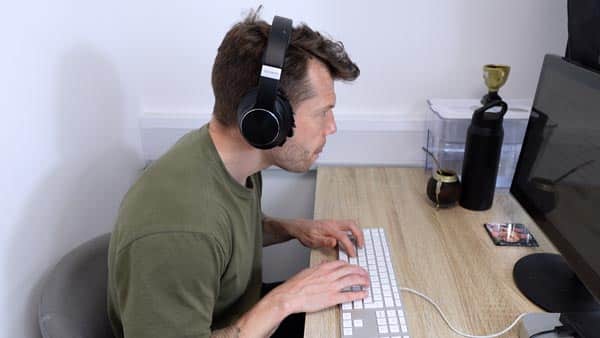
Weak Shoulders & Poor Posture
If you’re looking to undo years of rounded shoulders from hours spent hunched over your desk and boost your shoulder strength and stability at the same time..
TRX suspension trainer Face pulls exercise are your answer.
I know they sound like some medieval torture device. And honestly, if you’ve never tried them before, they look deceptively easy.
But trust me, the burn builds quickly in your rear shoulders and upper back.
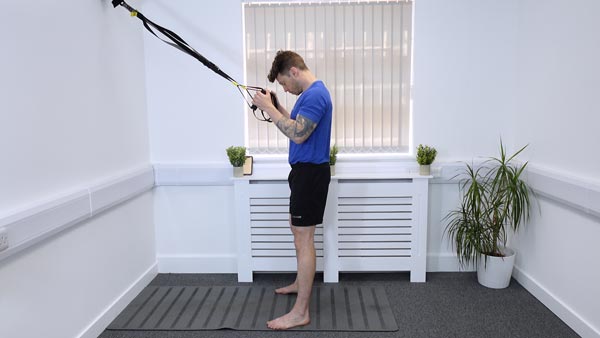
How To do FacePulls
Let me show you how to do suspension trainer Facepulls effectively so you can stand tall with a posture worthy of a Buckingham Palace royal guard.
Start by leaning back at just a slight angle, nothing too dramatic at first.
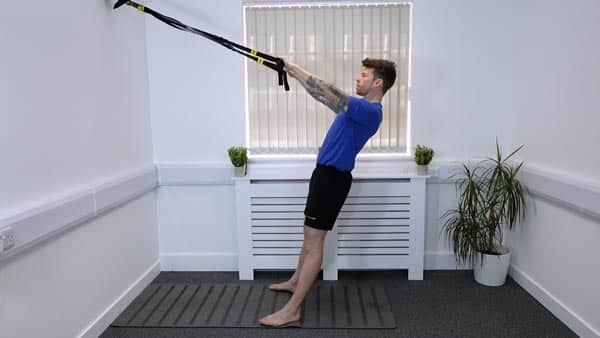
Pull the handles toward your face, aiming roughly at your nose level.
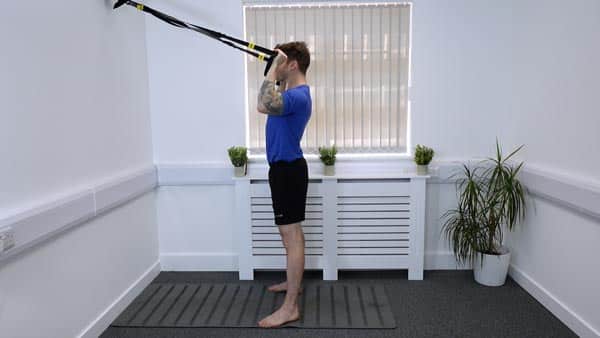
As you reach the top, rotate your knuckles upward and squeeze your shoulder blades together, holding that squeeze for a solid 2-3 seconds.
Then slowly lower yourself back down.
Keep a slight bend in your elbows at the bottom don’t just hang there, or you’ll lose tension in your back and rear shoulder muscles.
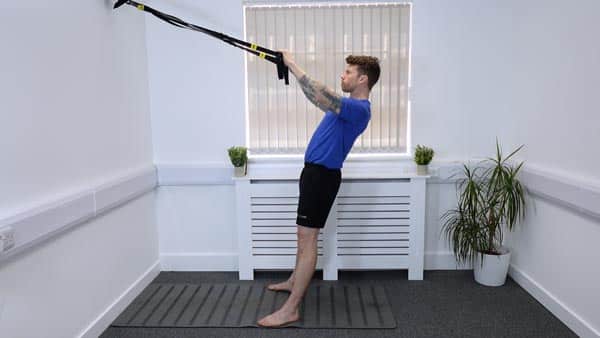
Aim for 8 – 10 reps and 3 sets.
Once you’ve mastered this basic form, you can ramp up the challenge by increasing your leaning angle or slowing down the lowering phase.
Slow and controlled movement is what we are seeking here, no rushing through the movement.
Now, let’s move on to the next four movements.
The last one is sure to stir up some internet debate (I can already hear the keyboards clicking), so we’ll save that controversy for the very end and hope some folks don’t make it that far.
Number two is the most powerful TRX exercise ever for mobility !!! And it’s also the most bland. If you don’t want:
- Bulletproof knees
- Agile hips
- Ankle stability
- And a longer life span
Then don’t do this bland exercise….
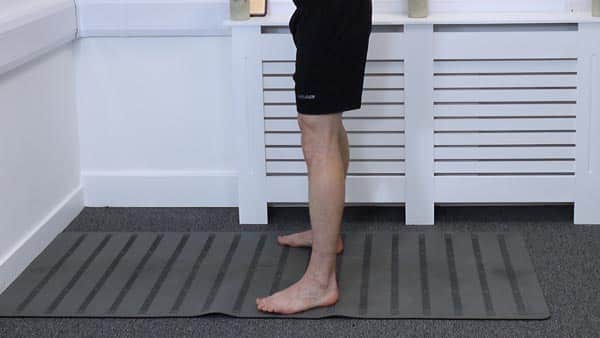
Lacking Hip & Leg Mobility
The simple primal squat is a powerhouse movement most people overlook.
But we’re not just talking about squatting down onto a chair…

We’re talking about a deep, “ass-to-grass” squat, and then being able to stand back up without any help.
That’s true mobility…

Maybe you can already do this multiple times, but that doesn’t mean you should neglect practicing it.
And if you can’t get your ass anywhere near the grass yet—don’t worry, I’ve got you covered.
Let me show you how you can use a suspension trainer to squat correctly and turn your leg and hip mobility from a stiff rubber band left in the freezer into one that’s warm and stretchy from sitting in the sun.
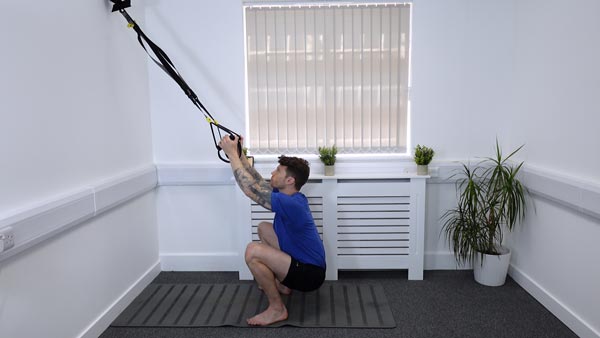
How to do a Primal Squat
First, remember this: whatever squat depth you have right now is great.
Not my squat depth, not anyone else’s, just yours. This is your starting point, your baseline to build from.
Grab the suspension trainer straps and step back until you feel some tension. Now, take a small step forward, you’ll see why in a second.
Position your feet slightly wider than shoulder-width, toes turned slightly outward, and then lean back just a bit.
This helps keep your weight over your heels and reduces stress on your hips and ankles.
Begin by slowly lowering yourself into a quarter or half squat—whatever feels manageable—and hold that position for around five seconds, using the suspension trainer for as much support as you need.
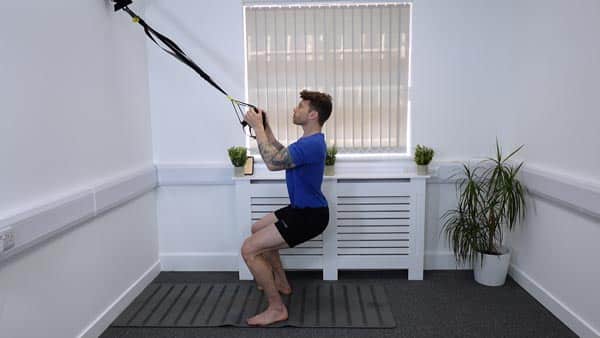
As your mobility improves, gradually progress to deeper squats…
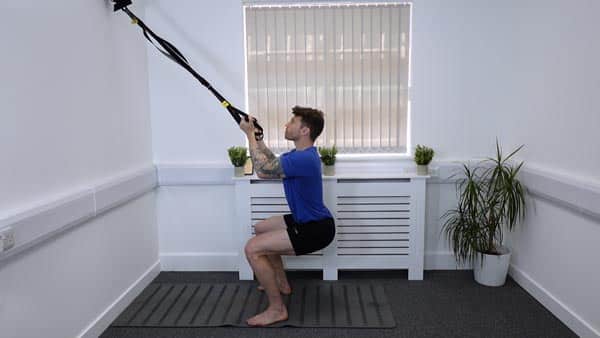
Eventually holding a full-depth squat for up to 30 seconds at a time…
While you’re down there, gently rock side-to-side or add small pulses to explore and improve your mobility.
Each time you practice, try to rely less and less on your upper body and the TRX for support.
You can do all these movements I’m going to show you can do as a dedicated mobility routine, which I’ve created for you, just enter your email below, and I’ll send it straight to you…
The “5 Best Suspension Exercises For INCREDIBLE Mobility” Routine PDF
Get this routine and perform it weekly to improve your mobility and flexibility…
But my favorite way to apply this one is by sneaking in “mobility microdoses” throughout your day.
For example, I do them while playing ball with my son or when squatting down to pick him up…

These little microdoses add up quickly, and you’ll soon realize how often you can improve your leg mobility without disrupting your busy schedule.
But improving your posture and hip mobility is only half the battle.
You won’t get far without a strong core—the golden thread that ties everything together.
So next, I’ll show you a TRX exercise that strengthens your core, improves hamstring flexibility, and enhances spinal mobility—all at once.
No Core & Postural Chain Strength
When you first see a plank-to-pike flow, it can look intimidating. You might think,
“There’s no way I’ll ever pull that off.”

But trust me, there are two simple ways to gradually build up to this movement, and you’ll find yourself mastering it faster than you imagined.
Let me show you the step-by-step progression of a suspension trainer core ike to plank flow so you can start stregthening your core today.
How to do a Plank to Pike Flow
First, set your straps to ankle height and place both feet securely inside. Get into a stable plank position, resting on your forearms.
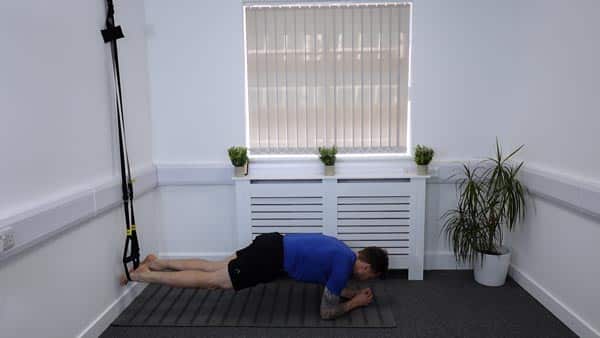
At this stage, your main goal isn’t speed or flow—it’s stability.
Here’s how you start:
- slowly lift your hips just a few inches toward the ceiling
- pause there for three seconds
- then lower back down to the plank and hold again for another three seconds.
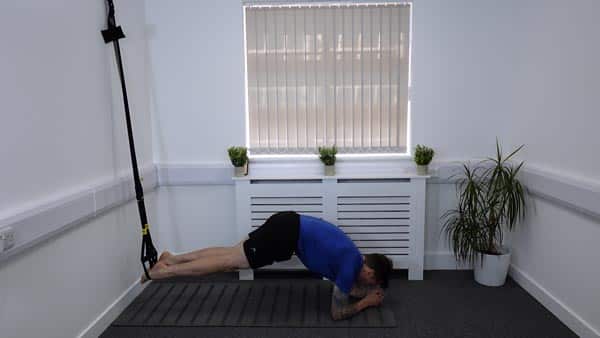
Over time, gradually lift your hips higher and higher and try performing it from a press up position.
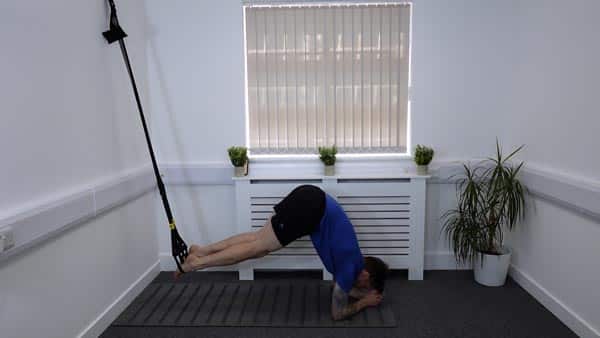
Once you can comfortably hold your hips at the top, you’re ready to smoothly flow from plank to pike.
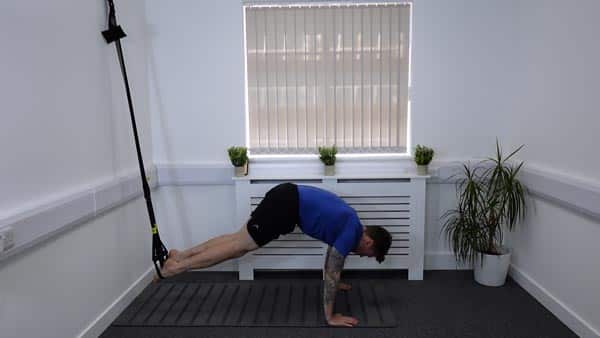
Take it slow, pausing for a second at the top and bottom to reduce momentum and increase your isometric strength.
Then, if you want to level it up even more, try adding a knee tuck at the bottom.
Or, if you’re feeling really adventurous, give a single-leg flow a shot.
Now, if you’ve got weak hamstrings and glutes, this next exercise is about to become your new best mate.
Well, the balance is pretty tricky so maybe more like your valued neighbor.
Get Your FREE Copy Of My ‘7 Skills To Build Muscle With A Suspension Trainer Handbook!’
Downloaded 70,000+ times! Just tell me where to send it:
Weak Hamstrings & Glutes
Weak glutes and hamstrings often come from being too “quad dominant.”
Think about it, most of our daily activities, like:
- climbing stairs
- kneeling down
- or leaning forward
All primarily rely on the front thigh muscles.
Over time, this means your quads get stronger, while your glutes and hamstrings lag behind, creating muscle imbalances that can lead to nagging knee and hip pain.
Suspension trainer single-leg hip bridges are a great solution to rebalance your legs. This exercise specifically targets your glutes and hamstrings.
Let me show you how to do them step-by-step so you can build strength and stability exactly where you need it.
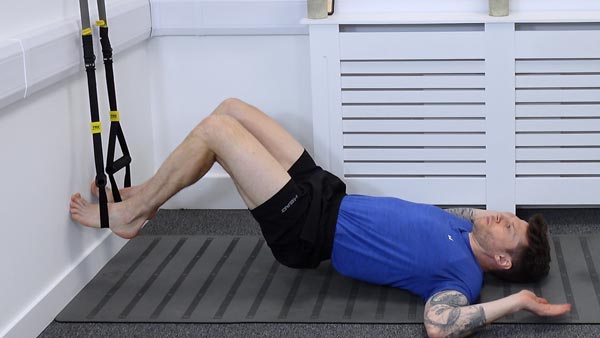
How to do Single Leg Hip Bridges
Set the straps to about mid-calf height.
If you’re new to this move, start with both feet in the straps
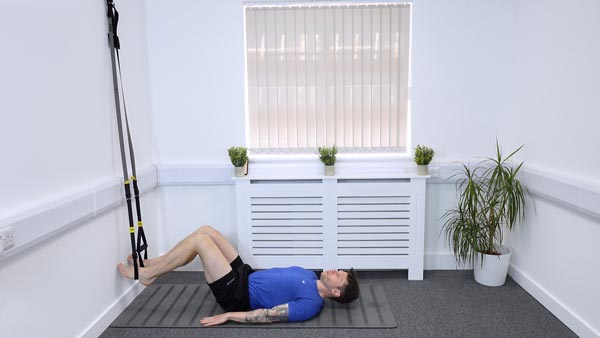
Lift your bum just an inch off the ground—this is your starting position. No resting on the floor!
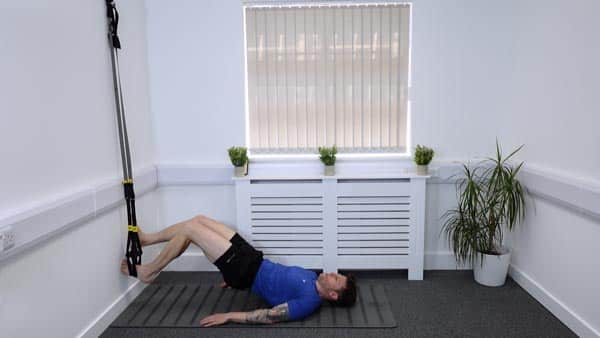
Now squeeze your glutes and press your heels firmly down into the straps, raising your hips toward the ceiling.
Pause at the top, giving an extra-hard squeeze to your glutes for two seconds, Your hamstrings will be active without the need for this mental focus.
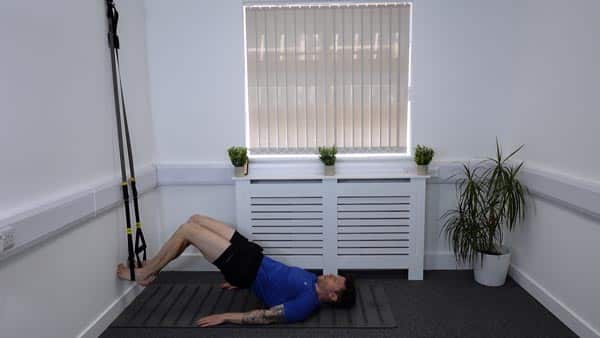
Then, slowly lower yourself back down.
Aim for 8–10 reps, completing 3 sets.
Once you feel stronger and more stable, progress to using one leg at a time, keeping the same slow, controlled pace.
We’ve covered your shoulders, hips, core, hamstrings, and glutes—but there’s still one critical area we haven’t addressed yet: your spine.
‘Tech Neck’ From Poor Spinal Alignment
When you spend all day hunched over your desk or glued to your phone, you develop what’s called “tech neck.”
This hunched posture reduces your spine mobility, creates tension in your upper back, and even restricts your breathing.

But I’ve got a simple TRX exercises fix for you.
Let’s reverse that hunched position and open up your chest with TRX exercises called Thoracic Extensions.
Think of it like steam ironing the creases out of a wrinkled cotton shirt—straightening and smoothing your back into correct alignment.
Let me show how to do them to achieve this:
How to do Thoracic Extensions
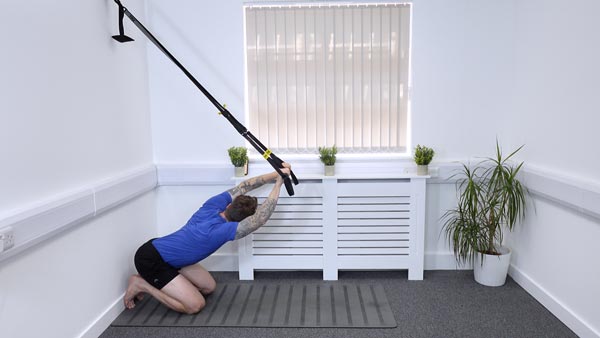
Set your straps at about knee height and kneel down, facing away from the anchor point.
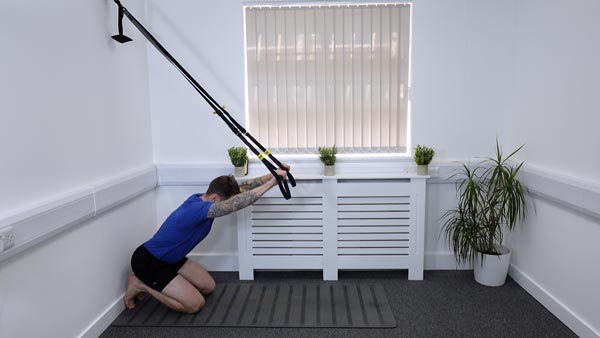
Extend your arms forward, then gently sit back toward your heels.
Now, slowly drive your chest downward, creating a gentle arch in your spine. Feel that stretch opening up your chest and sides.
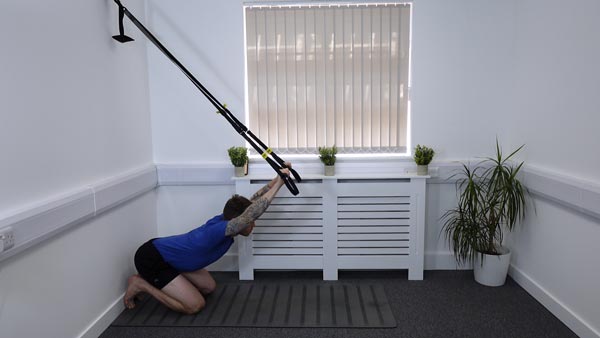
Hold this position for around 20 seconds, breathing deeply and calmly.
Slowly return to a neutral position and repeat this 5 times.
As you do this, close your eyes and focus on breathing deeply—really expanding your chest with each breath.
You’ll feel a nice, gentle stretch through your lats, those big muscles along the sides of your torso.
Then if you want to reduce back tension even more, add a gentle rotation from side to side as you arch downward to help your spinal mobility.
Transforming Your Body with TRX Exercises
Remember that improving your mobility takes time and consistency and if you’re one of these people that thinks a TRX suspension trailer is only good for these type of mobility exercises…
Checkout this post next where I’ll prove you wrong and show the techniques I used with a suspension trainer to build lean muscle and transform my body faster than I ever did using a gym, so you can do the same.
Your At-Home Mobility Suspension Training Coach,
Coach Adam


0 Comments